
 |
| Shabby Chic Dollhouse at Blurb |
Now, I have been a crafter all my life and tried almost every craft that came along. The only things I haven't done are woodcrafting and construction. No problem, right? Ha Ha! :p
Well, I was determined to do this project so inexperience never stopped me before, right? Before it was done, I had enlisted the help of Mr. B, my sweet and talented husband, and bought allot of extra items for my Dremel, especially the Trio. =)
I'm here now to share my experience with you. I couldn't blog about it while it was in progress because I had all I could do to just make it, let alone write about it. ;P
Well, now that the build is just a memory, I'll share the final results. I love how it turned out. This started out life as a Primrose addition kit from Corona.

This is a great kit for a first dollhouse. It's inexpensive ($14.99 HERE ) and small (12 ¼"W x 11 ½"H x 15 ½ D). You can do lots of fun things to this little house without investing a ton of money.


Following Caroline's PDF, this is what it turned into. Here is a front view. I did allot of things wrong, but managed to salvage them. I flipped the front of the house, having the door on the right side instead of the left like Caroline's instructions said. A quick email to Caroline and she assured me all was good. I was in a panic, but she was really supportive and nice. She answered all my questions quickly; I mostly needed reassurance. I probably should have flipped the roof to have the gable on the other side but I didn't. It's all good! lol The window boxes have hot glue decorations on them. I changed the windows from the typical four square panes to what you see here. These are very delicate and probably will pop off at some point. The siding is made of long wood strips with spackle in-between. As this was an afterthought it took me way longer than it should have, which was the case with most of this build.

The back view shows the tiny living space and the loft bedroom. It has 3 working chandeliers and a fireplace (non-working, of course!)
The reason it doesn't have any furniture in it is because I donated it to our local Cookeville Pregnancy Clinic for an auction. It went for way less than it probably should have but I learned allot from it and still want to make more houses! ;)
This last chandelier ended up being my favorite because it sort of reminds me of Cinderella's Pumpkin Carriage. I thought I was going to have to throw it out because the blob of hot glue for the core got so big; nothing a few pink jewels couldn't hide! The ceiling is made of cardboard tiles that were decorated with hot glue for a tin ceiling look. Walls are made of peeled cardboard. The curtains are dotted swiss with a rose border valance.
The reason it doesn't have any furniture in it is because I donated it to our local Cookeville Pregnancy Clinic for an auction. It went for way less than it probably should have but I learned allot from it and still want to make more houses! ;)
 |
| One of the "arms" on this chandelier BRoKE after it was totally installed (see some little seed beads on the floor?) That was really fun to repair(NOT)! The candle "flames" are simply hot glue drips. |
 |
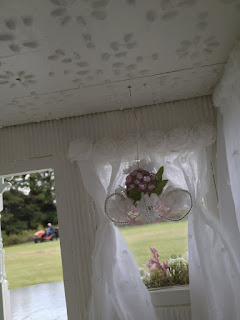
| This chandelier has paper roses glued all around the core of it. All the lighting is done with tiny battery-operated LED lights which you can purchase HERE. They have small coin batteries so they're easy to install. |

This last chandelier ended up being my favorite because it sort of reminds me of Cinderella's Pumpkin Carriage. I thought I was going to have to throw it out because the blob of hot glue for the core got so big; nothing a few pink jewels couldn't hide! The ceiling is made of cardboard tiles that were decorated with hot glue for a tin ceiling look. Walls are made of peeled cardboard. The curtains are dotted swiss with a rose border valance.
I think my favorite thing was the screen door. I wanted it to look old and shabby. So I made a little panel for the bottom insert on my Silhouette Cameo. I found a design I could adapt on the Silhouette website and altered it a little. Then I cut 4 copies of the design out of cardstock and glued them all together. They came out really stiff and I was able to fit it in the lower panel of the door. You can get incredible detail using the Silhouette that's not possible with hand cutting.


The fireplace was scratch built with hot glue decorations and cardboard tiles inside.

Some of the most important things I learned building this dollhouse were:
1. Make patterns of the exterior walls on paper right after popping them out of the kit sheets. This will save you allot of time when It comes to wallpapering, siding, etc.
2. While I only used hot glue for decoration, don't use it for assembling walls; your house will eventually fall apart! I was told this by some veteran DH makers on the Greenleaf forum HERE
3. The painting is very easy to make on a Woodsie. You just take the top of a paintbrush and load it with three colors of paint on the edges, push it on the surface and twist a bit. The colors blend. Just add a few leaf strokes and, BOOM, you're done.
4. Sand, sand, and sand some more. This will save you allot of time in the finishing process and make your house look professional.
5. Don't be a protectionist! Dollhouses seem to have a mind of their own and they tell you what they want to look like as you go along! lol
Well, that's enough for now. I will start on the Orchid next and make entries as I go. Stay tuned.....
Make Minis everyday!
Sarah